

An iPhone battery replacement in NZ can be a pricey endeavour, but it doesn’t have to be. You can actually replace an iPhone battery yourself with just a few simple tools. If your iPhone is no longer holding a charge the way it used to, it might be time to replace the battery. Many people think this is a difficult and technical process, but it is quite simple and can be done at home with a few tools.
This guide will walk you through the entire process of replacing an iPhone battery step-by-step. We will cover everything from opening the phone to testing the new battery. By the end of this guide, you will be an expert at replacing iPhone batteries!
-
Make Sure You Have All the Necessary Tools.
You’ll need a replacement battery and a set of screwdrivers (preferably ones that fit the screws on your iPhone). If you don’t have the right tools for iPhone battery replacement, pick them up at an electronics store or online before starting the process.
-
Remove the Two Screws Holding the Battery Connector Plate in Place.
The next step is removing the two screws that hold down the battery connector plate (located near where you plug in your charging cable). These screws are different sizes, so make sure not to mix them up when you put them back later!
-
Use a Suction Cup to Remove the I Phone’s Back Plate.
First, place the suction cup directly over the Home button and press down firmly. Then, move it around until you’ve created a seal with the back panel. It’s okay if you don’t get it right away — this is a very common mistake among first-timers.
-
Disconnect the Battery Connector.
Once you’ve removed the screen, use your spurge to pry up on one side of the battery connector and pull it out completely from its socket on the logic board (it will come off easily). Be careful not to bend it too much or otherwise damage it when removing it; this will prevent future problems with your iPhone turning on and off as it tries to reconnect itself.
-
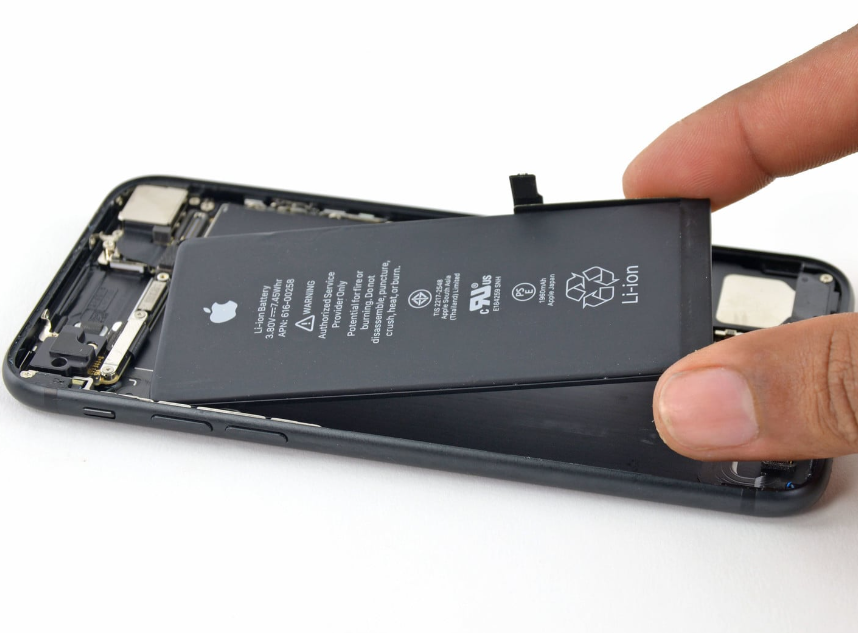
Use a Spurge to Pry the Battery Loose from Its Adhesive.
This tool is designed specifically for this purpose — unlike a screwdriver or any other sharp object — so don’t try to use anything else.
-
Reverse the Process to Install the New Battery.
Just follow these steps in reverse order for iPhone battery replacement in NZ from steps 1 through 4 above, and it will go back together just as easily as when we took it apart!
For further information visit this website!